To access an executive hangar, seven unique compboards are required, which can be found in various locations in the Pyro contested zones.
Completing an executive hangar grants the in-game ownership of one of five available ships. Each ship will be either the military or the stealth variant.
- Anvil F7A Hornet Mk II Executive
- Anvil F8C Lightning Executive
- Drake Corsair Executive
- Drake Cutlass Black Executive
- Gatac Syulen Executive
Rare FPS weapons (such as Grenade Launchers and Railguns) as well as Grade-A ship components can also be found within the hangar.
Security Doors
Each Contested Zone features locked doors that cannot be opened by regular means.
Fuse Doors
The most common type of locked door, the Fuse Door can be found in all contested zones with the exception of the Executive Hangars.
To open this door, the player must insert a Fuse into the receptacle on the front of the door (low on the door, and left of center). Fuses can typically be found somewhere near the Fuse door, in red sparking boxes on the walls. Looted fuses will re-spawn within a few minutes. Fuses can also be fabricated on salvage ships (Vulture, Fortune, Reclaimer), or purchased at certain outposts.
You can Carry the fuse directly off the wall (hold F when looking at it, and select Carry). Alternatively, you can Store it first in your armor/backpack, and then Carry it later (press i to open the inventory, right-click the Fuse, and then click Carry). While Carrying a fuse, an "Insert Fuse" UI element should be visible when close to the fuse receptacle in the door.
Sometimes, the "Insert Fuse" UI element will be missing. If this happens, you can still insert the fuse into the receptacle by using a tractor beam. Note, however, that the orientation of the Fuse is VERY sensitive and specific.
- Drop the fuse onto the ground, and pick it up with a tractor beam.
- Move the fuse close to the receptacle. A Yellow placement outline should appear.
- While holding R (rotation mode), move the mouse left/right, up/down, and scroll your mouse wheel to rotate the Fuse.
- Orient the fuse so that the back is facing the door, the side with the arrow is facing away from the door, and the arrow is pointed down.
- The placement outline for the fuse should turn Green if the fuse is correctly oriented. Left-click to place the fuse.
In rare circumstances, a fuse can become stuck in the receptacle without actually locking into place to activate the door. If this happens, you can dislodge the fuse by activating your tractor beam onto it, and rotating / pushing / pulling. It may take a few tries, but it should eventually become dislodged.
Once the Fuse Door is open, it will remain open for approximately 30-60 seconds before automatically closing. To help protect yourself from approaching players, it is recommended that you manually close the fuse door behind you. Looking back at the Fuse Door, you can find the control panel on the left part of the door. When the Fuse Door is closed, you can also open it from the inside using this control panel, either to escape the zone, or to allow other players to follow you in.
Keycard Doors
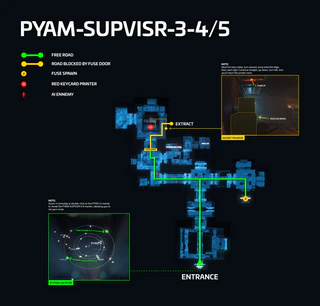
Keycard Doors can be found on all three of the primary Contested Zones (Checkmate, Ruin, and Orbituary). They prevent direct access to valuable loot, such as Boards 1 through 7, Grade B ship components, or various mid-tier ship weapons.
In order to open these doors, you must insert the corresponding keycard into the keycard slot, just below the door's control panel. These keycards can typically be found nearby, using a keycard printer. However, Red keycards can only be found at separate locations elsewhere in the system.
Within Pyro, there are five door/key pairs:
- Supervisor (Red)
- Security (Blue)
- Crypt (Gold, Green)
- Last Resort (Gold, Yellow)
- Wasteland (Gold, Blue)
Just like Fuse Doors, the player can manually open or close a Keycard Door from the inside.
Red Keycards
Red Supervisor Keycards can be printed at either of two asteroid bases that share a solar orbit with Bloom.
- PYR3 L4 > PYAM-SUPVISR-3-4
- PYR3 L5 > PYAM-SUPVISR-3-5
These locations do not appear when using the Search function on the Starmap, but can be found by panning and zooming the map manually. The printers are in an enclosed room, and are only accessible by climbing onto some nearby boxes and moving through a short passage in the ceiling. The enclosed room has two exits: one by unlocking a side door, and one by dropping down into a crawlspace.
The printers themselves have a 30 minute cooldown.
Blue Keycards
Blue Security Keycards are much more common, and can be found in 2 of the 3 primary Contested Zones:
- Checkmate
- Orbituary
Checkmate has 3 Blue keycard printers. This is the most accessible source of Blue Cards, if you are attempting to stockpile them, as you only need to bypass two fuse doors in order to reach them.
Orbituary has 2 Blue keycard printers. However, they are more difficult to reach, as both are locked behind a red supervisor door.
Like the Red keycard printers, the Blue keycard printers have a 30 minute cooldown.
Crypt, Wasteland, and Last Resort Keycards
These three keycards are found at the last of the three Contested Zones: Ruin.
All three keys are located behind their own fuse doors (1 fuse per key). Unlike the 30 minute cooldown of the Red and Blue keycard printers, these printers have a 20 minute cooldown.
After entering the vault, these three keys are used to unlock three doors, each one containing separate items and loot:
- Crypt - The printer for Board 5 is hidden behind this door. Various other Grade B ship components can also be found here.
- Wasteland
- Last Resort
Accessing the vault requires you to bypass another type of security door: the Timer Door.
Timer Doors
A Timer door is a security door that opens and closes by itself, independently and automatically, on a timer schedule.
There is only one Timer Door in the game, currently, and it is located in the contested zone at Ruin Station.
Timer Doors have four phases. The current phase of the door is visible on a sign above the door:
- Closed - The door is closed.
- Opening - The door is closed, but preparing to open.
- Open - The door is open.
- Closing - The door is open, but preparing to close.
The repeating cycle for the Timer Door at Ruin station is to open for 1 minute, and then close for 20 minutes. Future timer doors added to the game may operate on different timer schedules, and could be implemented without a status sign.
30 seconds prior to the door opening, bright blue lights will turn on in the central room of Ruin Station contested zone, "Ghost Arena." While the door is opening, these lights change to red?, and then change to white while the door is open. After the door has closed, these lights turn off.
A timer door cannot be manually opened or closed by the player, even if they are on the inside. There are no panels to interact with.
Executive Hangar Doors
These doors can only be found at the three Executive Hangar asteroid bases at PYAM-EXHANG-0-1, located just south-west of the Pyro star.
To open the door, three conditions must be met:
- At least one indicator light in the zero g. room must be green
- Zero of the indicator lights are red (See section Status Lights Lights for more information)
- The player must insert all 7 compboards into their appropriate receptacles (accessible in the zero-g area)
Once opened, the door to Engineering will remain open for 30 minutes. When the door is preparing to close, an alarm will sound. When the doors close, any players or ships within the Hangar or within Engineering will be killed or destroyed.
It is not possible for a player to manually open close the Executive Hangar Doors from the inside.
Contested Zones
Checkmate
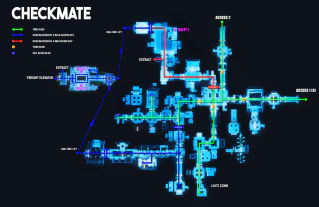
- Board 1 is behind a fuse door and a red door.
- Boards 2 and 3 are in the contested zone's hangar. This area is accessible from two different entrances in the main contested zones area:
- Behind a fuse door, the red door, and then a blue door
- Two fuse doors, and then two blue doors.
Orbituary
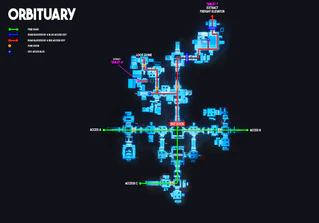
- Board 4 is behind a fuse door, a red door, and a second fuse door.
- Board 7 is in the contested zone's hangar, behind the fuse door, the red door, another fuse door, and then two blue doors.
Ruin Station
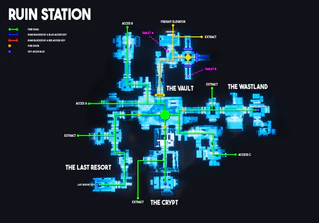
- Board 6 is in the vault, behind a door running on a fixed timer. This vault door opens approximately every 21 minutes, and opens for about one minute. Once the door is closed, it will stay closed for 20 minutes.
- Board 5 is also in the vault, but behind yet another door. The green key for this door can be printed in the crypt, behind the fuse door opposite the vault door. This printer is on a 30 minute cooldown.
PYAM-EXHANG-0-1 (Executive Hangars)
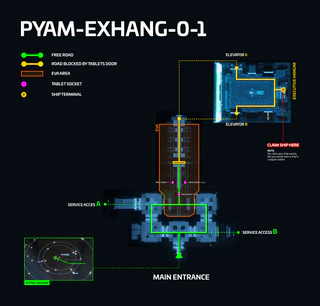
This cluster of three asteroid bases can be found near the sun. Only one base in the area is active at a time. Every base has the same layout.
Status Lights
Once inside the base, in the EVA area, there will be a series of lights. If at least one light is green and there are no red lights, the executive hangar can be accessed. A red light turns green every ~24 minutes. A green light turns off every ~12 minutes. 5 minutes after the last green light turns off, all five lights will turn red. Only when green lights are active, and no red lights are active will inserting compboards unlock the door.
Access
To open the door leading to the hangar, use the seven compboards on the seven slots along the pipes where the lights are. Once in the hangar area, the reward ship can be claimed. The ship is exclusively claimable by a single player. Once the ship is claimed and retrieved at the ASOP terminal, the hangar door will open. This door will close after 10? minutes, and will not open again.
It is recommended to bring a cargo ship, as a number of ship components and weapons will spawn in the hangar, and the reward ship may not have enough cargo space for them all.