The Mining Profession
"Mining presents players with a variety of challenges requiring skill and intelligence, whereas the mindless repetition of a task and idle drudgery are explicitly avoided. There are no aspects of mining that allow a player to simply press a button and wait without concern for a result, or that require players to perform an action repeatedly without some element of thought and/or dexterity coming into play.
Ample amounts of dangerous situations are afforded, despite the fact that combat isn’t inherent in any fundamental aspect of the effort. The most valuable materials will often reside deep within a dense field, the result of less experienced pilots being unable to extricate them without suffering serious damage to their ship. Compressed pockets of gas, volatile materials that can explode in the presence of excessive energy (which is required in some capacity in order to liberate the ore from its parent asteroid), and elements that can explode when subjected to seismic vibrations as caused by repeated fragmentation operations all present their own unique types of jeopardy. While most miners will seek to actively avoid armed conflict, the reality is that any ship carrying a cargo of valuable ore will present a tempting target to less scrupulous types, rewarding those players that formulate contingency plans in advance, whether that be the hiring of an NPC crew member extremely talented with a defense turret, or investing a portion of the expected profits into hiring an armed escort or two.
Finally, multiple roles of substance are presented, each of which is referred to as a specialist. Every role can occupy the full attention of a player and present sufficient challenge to keep them engaged, or assigned to an NPC whose skills are commensurate with their monthly cost."[1]
- Tony Zurovec, Director, Persistent Universe
Step one: Equipment
The first step to any mining expedition is having the necessary equipment to mine. Most players embarking on such expedition often use a dedicated mining vessel for significant returns. However, players can begin their mining experience using the Pyro RYT Multi-tool by Greycat with an OreBit Mining attachment which is a more affordable option in combination with the MacFlex 'Rucksack' Core for increased carrying capacity. Combining the Multi-tool along with a mining vessel will provide an even greater return.
Mining vessels can be rented for a fee using aUEC.
Tip: Rental ships cannot be equipped with different components.
| Vessel | Brand | Min. Crew | Mineral Capacity | Purchase Price | Rental Price (days) | Rentable at | Purchasable at | |||
|---|---|---|---|---|---|---|---|---|---|---|
| 1 | 3 | 7 | 30 | |||||||
| Prospector | MISC | 1 | 32 SCU | 2,061,000 | 41,220 | 108,202 | 216,405 | 772,875 | Travelers, Area 18, ArcCorp | Teach's Ship Shop, Levski, Delamar |
| Vantage Rentals, Lorville, Hurston | New Deal, Lorville, Hurston | |||||||||
| Mole | ARGO | 2 | 96 SCU | TBD | N/A | N/A | N/A | N/A | N/A | N/A |
| Orion | RSI | TBD | TBD | TBD | N/A | N/A | N/A | N/A | N/A | N/A |
| ROC | GRIN | 1 | 0.8 SCU | 172,000 | N/A | N/A | N/A | N/A | N/A | New Deal, Lorville, Hurston |
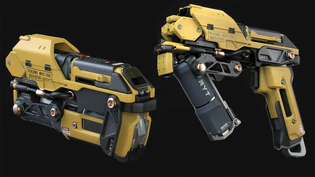

| Item | Location | Store | Price (aUEC) |
|---|---|---|---|
| Pyro RYT Multi-tool | Levski | Conscientious Objects | 499 |
| Lorville | Tammany and Sons | 452 | |
| Area 18 | Cubby Blast | 412 | |
| OreBit Mining attachment | Levski | Conscientious Objects | 375 |
| Lorville | Tammany and Sons | 375 | |
| Area 18 | Cubby Blast | 310 | |
| MacFlex 'Rucksack' Core | Port Olisar | Garrity Defense | 3094 |
| Grim Hex | Skutters | 3094 | |
| Lorville | Tammany and Sons | 3094 |
Step two: Trade and Development Divison (TDD)
Once players have the necessary gear, it's time to determine what mineral is currently in demand or yields a good enough profit margin for the player.
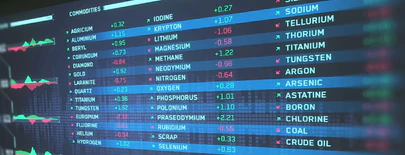
Located in Area 18 at ArcCorp, the Trade and Development Division (TDD) is the epicenter to find this information. Once a satisfactory location is determined by the player, they're off to their expedition.
Note: The TDD is currently not complete as of Alpha 3.8.1.
Note: The TDD can be visited for commodity trading only.
Step three: The Expedition
Now the nitty-gritty begins. Once the player arrives at their location of choice, the first stage of a four-stage process begins in order to mine successfully which includes: Prospecting, Fracturing, Extraction, and Refinement.
Stage one: Prospecting
Prospecting is the first step to any mining operation that requires the discovery of minerals to occur. Using a ship's dedicated scanner, a mining crew would search by "pinging" the area for any mineral deposits. If sub-surface mining, this stage is done without the use of any equipment other than a miners' observation and knowledge of harvestable minerals. Once a mineral deposit has been discovered, a further in-depth scan is done to determine the composition of the deposit. Once minerals are confirmed and merited, the next stage begins.
Begin to scan by pressing Tab ↹ to bring up your ship's dedicated scanner. If no scanner appears, your ship does not have any scanner. If it does, your ship will change into "Scanning Mode" and the HUD will appear with a dense white circular reticle with a magnification level. By using your mouses 'scroll wheel', you can adjust the magnification of your scanner. By increasing magnification, you're setting your scanner's boundaries in a narrow path directly in front of the ship. The higher the magnification, the more narrow the boundary becomes.
In order to activate the search, press and hold the Right Mouse Button and the charging reticle will appear center screen. This determines the strength of your ship's scanner. By releasing the Right Mouse Button when the charge reaches 100% will emit the strongest ping to the surrounding area. However, this significantly increases your ship's signature level which may expose you to other nearby ships. The lower the charge, the lower the strength your scanner will emit and the lower signature level would be shown.
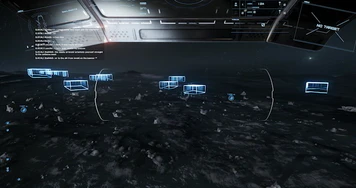
Once your scanner finds a mineral deposit, a large cube-shaped signature would appear on your ship's HUD. The cube size demonstrates the possible area where the mineral deposit lies. The cube's signature will only appear temporarily. By sending additional pings towards the general area will cause the signature to reappear. The closer your ship is to the signature, the more accurate of a location would be returned.
When the mineral deposit is located, a small icon will appear directly on the deposit. A 'rock shaped' icon signifies that you've found a large mineral deposit. A 'diamond' shaped icon will signify that you've found a small mineral deposit commonly referred to as, 'harvestable minerals'. A 'question mark' icon may appear in the distance, this signifies that your ping is returning insufficient information. Ping closer to that area to return sufficient information.
When aimed directly towards a mineral deposit, and in range, a 'scanning progress' bar would appear. You can begin an in-depth scan of the mineral deposit by pressing and holding your Left Mouse Button. Information on the mineral deposit will appear on your ship's HUD. The longer the scan is made, the more information is shown.
If scanning solely with a hand-tool, large mineral deposits will become significantly difficult to find and impossible to mine due to insufficient energy levels required for a fracture. Small mineral deposits, or 'harvestable minerals', can be distinguished by its colored 'vein-like' features on the rock itself. You can equip your hand-tool by pressing key '4' to bring up your utility weapon. Press and hold the key R will holster your weapon. By pressing your Right Mouse Button, you will aim down sights (ADS) of your multi-tool. Direct the sights towards a harvestable mineral and a display status stating 'scanning' will appear. This signifies that your multi-tool is scanning the mineral and once complete, relative information would be displayed.
Tip: It is strongly suggested to use a hand-tool to mine harvestable minerals for which using a ship's mining laser will instantly overcharge small mineral deposits causing an explosion and potential harm to you and/or ship.
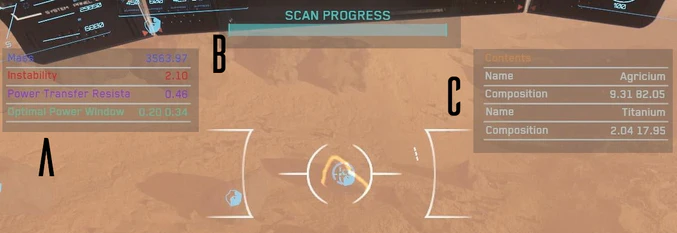
B: Scan Progress: Displays how complete the information is given.
Stage two: Fracturing
Fracturing mineral deposits consist of very dense rock and are often large in mass. Before a rock is able to be extracted, it must first be broken down into smaller fragments. This stage is done by using a dedicated ship's mining laser or hand-tool to emit a powerful laser into the rock to increase its energy level high enough to cause the rock to fracture. This process is very delicate for emitting too high of a laser's energy into the rock will cause an explosion that can seriously harm or cause death to the mining crew. Once the rock is successfully broken into smaller fragments, the next stage can occur.
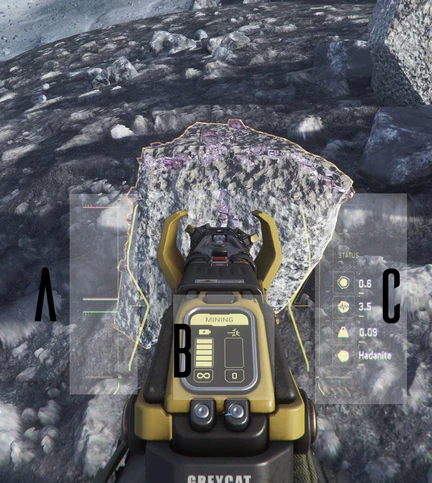
When you have found a mineral deposit that merits a fracture, position your ship within your mining lasers' optimal range. The closer your ship is to the mineral deposit while emitting from the mineral laser causes the laser the emit densely, thus increasing its strength.
Breakdown (fig 1.2)
A: Rock Energy Level: The amount of input energy is being emitted from the hand-tool. A white progress bar and arrow will display its current level. Anything below the 'Green zone' is insufficient to fracture the deposit. The 'Green zone' is the optimal power window. If levels are within this zone, a progress bar within the green zone will appear. Once filled, the rock will fracture. If filled with any overcharge level, the rock may explode relative to the amount filled. The 'Red zone' is the rocks 'Overcharge level'. A progress bar within this zone will appear, once filled, the rock may result in an explosion and loss of minerals.
B: Mining Display: The left bar is your hand-tools battery charge. This bar is not yet functional as of Alpha 3.8.1. The right bar is your 'Laser throttle'. A higher level will emit stronger input energy.
C: Mineral Information: The 'Status' display shows whether you're 'Scanning' or 'Charging'. The 'Rock' icon displays the mineral's resistance towards input energy. The 'Rhythm strip' icon displays the instability of the rock. Higher instability = Higher volatility. The 'Weight' icon displays the number of minerals to be expected once fractured.
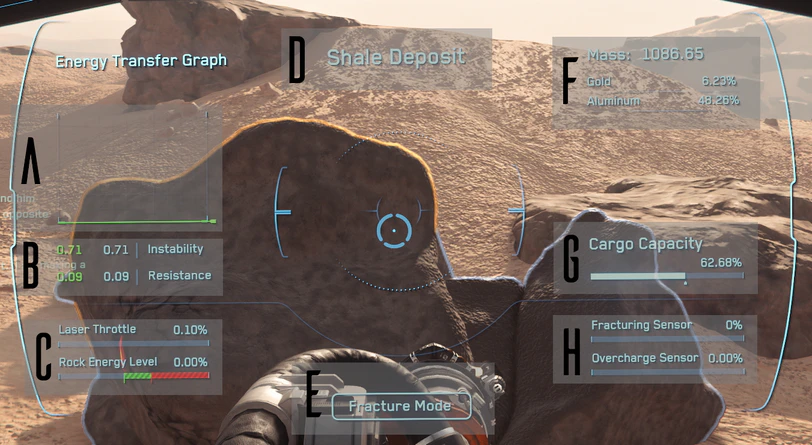
Breakdown (fig 2.1):
A: Energy Transfer Graph: Displays a line chart of how the rock is reacting to your lasers' input energy.
B: Instability/Resistance: The leftmost number displays the rock's instability and resistance levels respectfully, in real-time when one or more mining lasers with modifiers are being used. The rightmost number displays its original level.
A high level of instability signifies the rocks' energy level may be volatile. The lower the instability level, the more stable it is.
A high level of resistance signifies the rock's ability to resist your mining lasers' input energy. The lower the resistance, the lower the energy is required.
C: Laser Throttle & Rock Energy Level: The laser throttle displays your current level of input energy that's being emitting from your ship's mining laser. The 'Rock Energy Level' displays how much energy is within the rock. Below the 'Green Zone' is insufficient energy. The 'Green Zone' is your optimal range for a successful rock fracture. The 'Red Zone' is the rocks overcharge zone, being within this range will cause mineral loss and possible explosion.
D: Mineral type: This displays the mineral deposits type.
E: Mode: This displays what mode your laser is currently in.
F: Rock Information: The 'Mass' signifies the rock's mass size followed by the rock's mineral composition. The percentages will not always add to 100%, the unaccounted percentage is the rocks 'inert material'.
G: Cargo Capacity: This displays your ship's mineral storage capacity. Extracting minerals past 100% will be rejected to prevent damage.
H: Fracturing Sensor/Overcharge Senor: The 'Fracturing Sensor' displays how close the rock's input energy is to reach a sufficient fracture. This level only rises when the Rock Energy Level is within the optimal range and decreases when below the optimal range. The 'Overcharge Sensor' displays how much the rock is being overcharged with input energy. The overcharge sensor will decrease when below the range. If the 'Fracturing Sensor' reaches 100% while having any Overcharge levels will result in an explosion relative to the overcharge level.
Stage three: Extraction
Extraction is the process when a mining crew, after a rocks fracture, breaks down the fragments for transport. This is done by using a dedicated ship's extraction beam which will automatically breakdown the fragment and simultaneously moves the rubble to its storage bay. If the FPS mining technique was used, this process is done by simply moving the mineral into a miner's storage compartment. The extract raw minerals are then usually sold after this stage to various landing zones.
Once a rock is fractured to its minimal form, a purple outline around the fragment confirms it's ready for extraction. Press the Right Mouse Button to swap from your fracturing mining laser to your extraction laser. Simply press the Left Mouse Button to activate your laser towards the intended rock fragment. The extraction laser will automatically stop once the rock fragment is completely taken and enough ship storage capacity is available. Press the Left Mouse Button anytime while the laser is active to deactivate.
If FPS mining, you can simply go into your inner thought by pressing F and selecting 'Stow' while facing towards your intended mineral. This will stow your item within your personnel inventory.
You can sell your mined minerals to major landing zones for refinement, or refine the minerals onboard your ships integrated refinery if available for greater returns.
Tip: Ran out of space in your personnel inventory? Just move your minerals into a crate! Go into your personnel inventory by pressing I and select the 'Open Box' icon to store all. This will empty your personnel items into a moveable crate that you can carry and simultaneously create more room in your inventory!
Stage four: Refinement
Refinement is a process which removes impurities and unwanted elements from the extracted rock in order to be sold. This stage is often done by major landing zones but can be done by the mining crew for greater returns using an integrated refinery if available.
Refining methods
| Name | Speed | Cost | Yield |
|---|---|---|---|
| Cormack Method | High | Moderate | Low |
| Pyrometric Chromalysis | Low | High | High |
| Gaskin Process | High | High | Moderate |
| XCR Reaction | High | High | Low |
| Ferron Exchange | Low | Moderate | High |
| Electrostarolysis | Moderate | Moderate | Moderate |
| Dinyx Solvenation | Very Low | Low | High |
| Thermonatic Deposition | Low | Low | Moderate |
| Kazen Winnowing | Moderate | Low | Low |
Step four: Profit
You can either sell your raw minerals to be refined at landing zones with a suitable refinery or refine the minerals for greater returns. You can sell raw minerals to these locations:[3]
Any harvestable minerals can be sold directly via the trading kiosk. Any crates filled with minerals can be placed on the counter at the Admin desk for payment.
Information current as of Alpha 3.8.1
References
- ↑ Zurovec, Tony. "Design: The Mining Occupation." RobertSpaceIndustries, Cloud Imperium Rights, 2015-02-20
- ↑ Thrysurr-CIG. "Mining Basics." RobertSpaceIndustries, Cloud Imperium Games, 2019-11-05
- ↑ Danneberg, Benjamin. "Star Citizen: The Ultimate Mining Guide." Space4Games, Space4Games, 2020-01-11